Quick Start Guide
User Manual
Technical Specs
Please read this document to familiarize yourself with the unit’s functions. Note that specifications are subject to change without notice.
1. Packing List
Section titled “1. Packing List”Please check that your package contains the following items:
| Item | Quantity |
|---|---|
| Device | 1 PCS |
| Power Adapter | 1 PCS |
| Warranty Card | 1 PCS |
| Quick Start Guide | 1 PCS |
| Certificate | 1 PCS |
2. Device Interfaces
Section titled “2. Device Interfaces”Hardware Overview
Section titled “Hardware Overview”Refer to the diagram below for the physical interface layout.
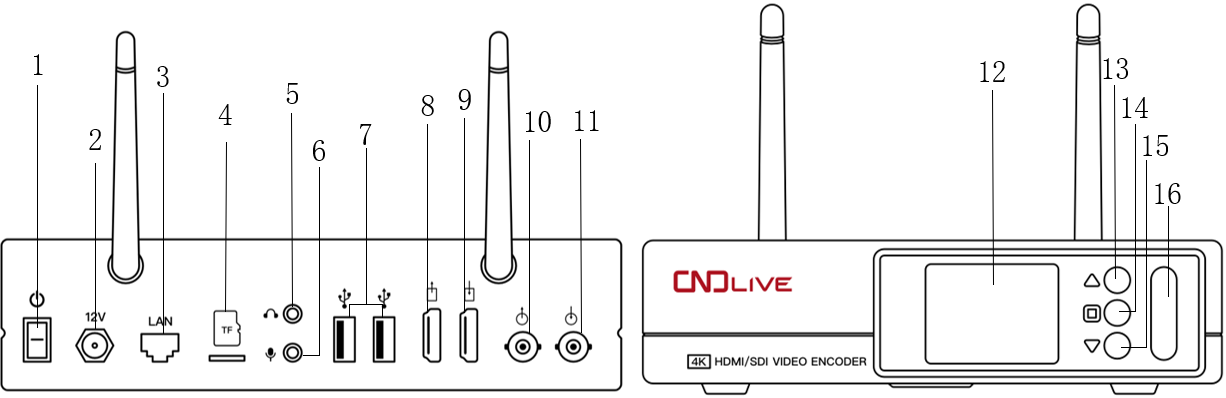
| ID | Component | ID | Component | ID | Component |
|---|---|---|---|---|---|
| 1 | Power Switch | 2 | Power Port | 3 | 1000M RJ45 Ethernet Port |
| 4 | Micro SD/TF Slot | 5 | 3.5mm LINE IN | 6 | 3.5mm LINE OUT |
| 7 | USB-A Port | 8 | HDMI Loop | 9 | HDMI IN |
| 10 | SDI Loop | 11 | SDI IN | 12 | LCD Screen |
| 13 | Up Button | 14 | OK Button | 15 | Down Button |
| 16 | Tally light |
Installation & Connection
Section titled “Installation & Connection”- Connect Signal Source: You can connect both HDMI and SDI sources, or just one.
- Connect Network: Connect the Ethernet cable to your working network.
- Power On: Use the equipped power adapter to power the device. Turn on the switch button on the panel after setup.
⚠️ Note: If the preview screen is blue or abnormal, check that the source is correctly connected, verify video resolution formats, or change the cable.
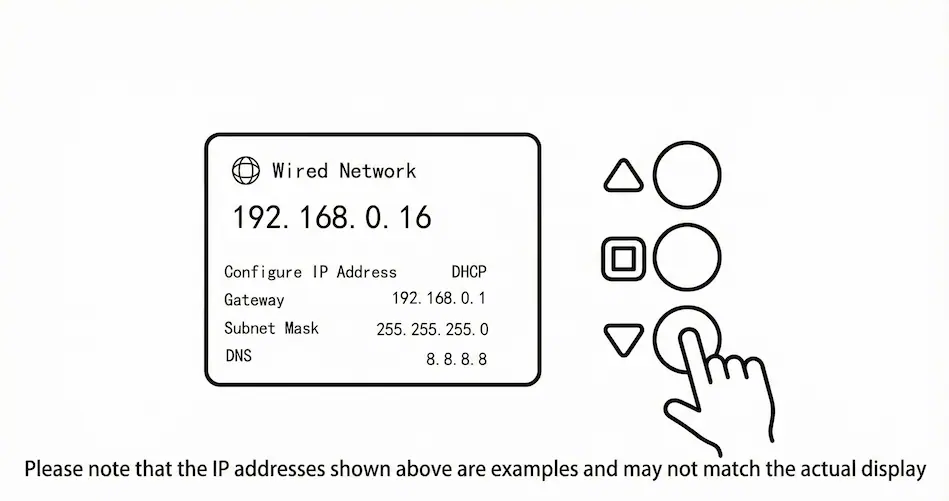
3. Network Configuration & Login
Section titled “3. Network Configuration & Login”3.1 Check IP Address
Section titled “3.1 Check IP Address”The device requires a network that supports DHCP. You can find the assigned IP address via the device’s LCD screen:
- Press the “Down” button until you see the “Wired Network” information.
- Note the IP address displayed (e.g.,
192.168.0.16).
3.2 Log in to Web UI
Section titled “3.2 Log in to Web UI”- Open a web browser and enter the IP address found in the previous step.
- Enter the default credentials below to log in:
| Parameter | Default Value |
|---|---|
| Username | admin |
| Password | admin |
4. Video Source Selection
Section titled “4. Video Source Selection”By default, the video source is set to HDMI, but you can change this via configuration.
- Navigate to Encoding > Video Signal.
- Use the dropdown menu to select HDMI, SDI, A mix, or B mix.
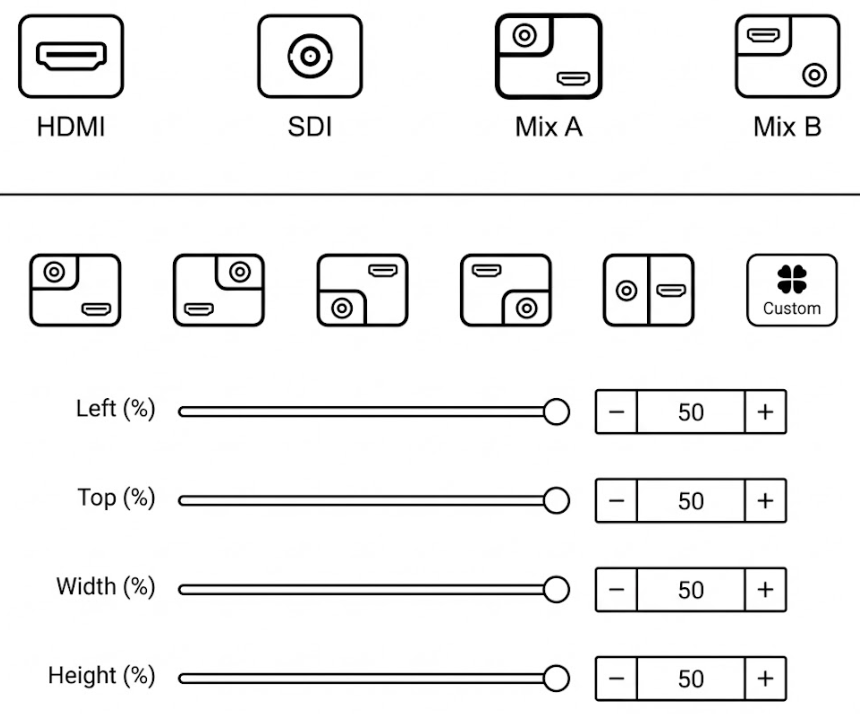
- Return to the Home page to preview the real-time video of the current encoding source.
5. Streaming Configuration
Section titled “5. Streaming Configuration”5.1 Add NDI|HX Stream Service
Section titled “5.1 Add NDI|HX Stream Service”- Click Home on the dashboard, then click Stream Service.
- Select NDI|HX in the popup dialog box.
- Configure:
- Name/Channel: Fill in the name and channel name.
- Group: Optional (default is “public”).
- Click OK to save.
- Viewing: Open NDI Studio Monitor (from NDI Tools). Right-click to auto-discover the device and select the configured channel.
5.2 RTMP Live Streaming (YouTube Example)
Section titled “5.2 RTMP Live Streaming (YouTube Example)”- Click Home > Stream Service and select RTMP/RTMPS.
- Get Stream Details: Go to YouTube “Live Video,” enter the live room, and copy the Stream URL and Stream Key.
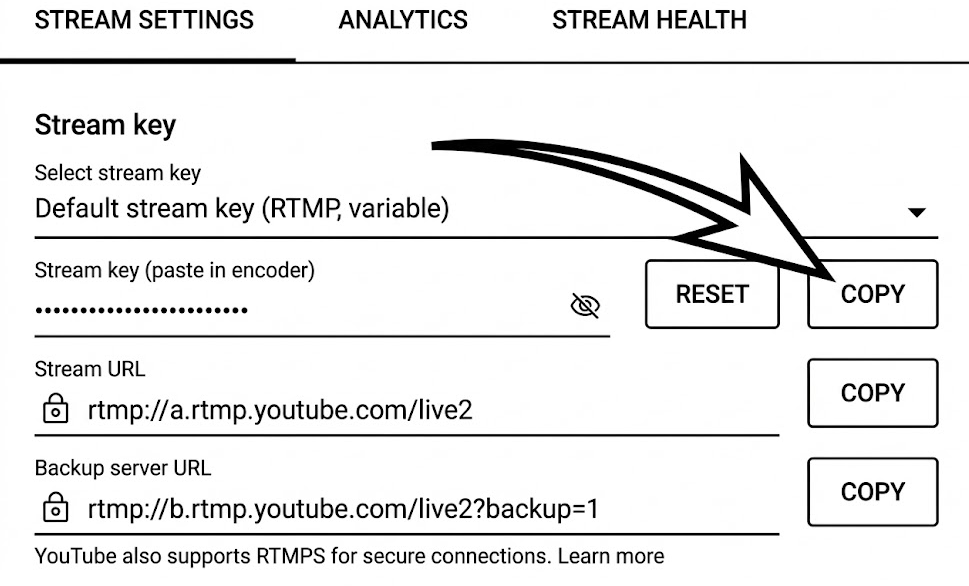
- Configure Encoder: Fill the URL and Stream Key into the encoder’s RTMP push point address.
- Start the streaming service to go live.
RTMP Configuration Notes
- Format: If the platform separates the RTMP address and Live Broadcast Code (Stream Key), add a
/between them (Format:RTMP address/live broadcast code).- Auth: Username and password are usually not required unless the platform explicitly configures the live room with them.
- Compatibility: Most platforms can stream directly by default.
6. System Maintenance
Section titled “6. System Maintenance”6.1 Firmware Update
Section titled “6.1 Firmware Update”- Click Updating to check for the latest firmware.
- If available, select the downloaded firmware and click Firmware Upgrade.
- Wait: The upgrade takes approximately 3-5 minutes. The device will reboot automatically upon completion.
⚠️ Warning: Do not power off the device during the upgrade process, as this may cause the device to fail. If the process is not complete after 5 minutes, refresh the webpage.
6.2 Restore Factory Settings
Section titled “6.2 Restore Factory Settings”If the device is not functioning normally or you have forgotten the IP configuration, perform a factory reset.
Method 1: Via LCD Screen
- On the “State” page, click
Enter. - Navigate to System Settings > Down > Reset.
- Click
Enterto confirm.
Method 2: Via Web UI
- Go to Settings > System settings.
- Click Restore factory settings.
Method 3: Via Front Panel Buttons
Press and hold the Up and Down buttons on the front panel
simultaneously for 8 seconds
Post-Reset Status:
- Username/Password: Resets to
admin/admin.- Network: Resets to DHCP mode.
- Encoding: All video/audio parameters reset to default values.
7. Support
Section titled “7. Support”- Email: support@cndlive.com