How to Set Up Game Streaming on PC: The Complete Guide to Dual-PC Streaming with NDI
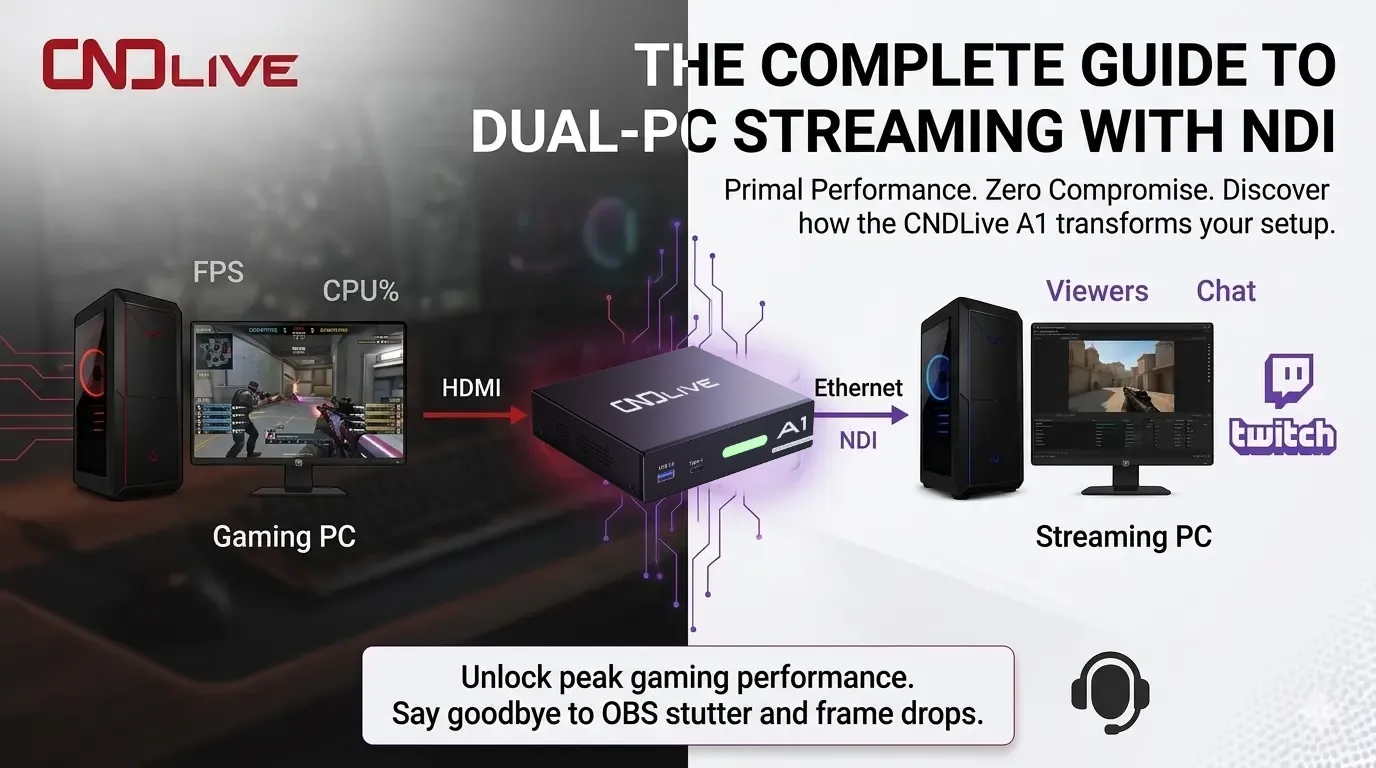

If you’ve ever tried to stream a demanding AAA title from a single PC, you already know the pain. Your frame rate tanks, OBS stutters, and no amount of setting tweaks seems to fix the problem. The root cause is simple: your gaming rig is being asked to run a blockbuster game and encode a high-quality video feed at the same time. The elegant solution? A dual-PC streaming setup.
In this guide, we’ll explore how to build a dual-PC streaming rig with zero performance compromise. You will learn how different capture methods compare, why the NDI protocol has become the gold standard for local network streaming, and how a dedicated hardware converter — specifically the CNDLive A1 Bi-Directional NDI Converter — can eliminate every last bit of load from your gaming machine.
The core challenge: Single-PC vs dual-PC streaming
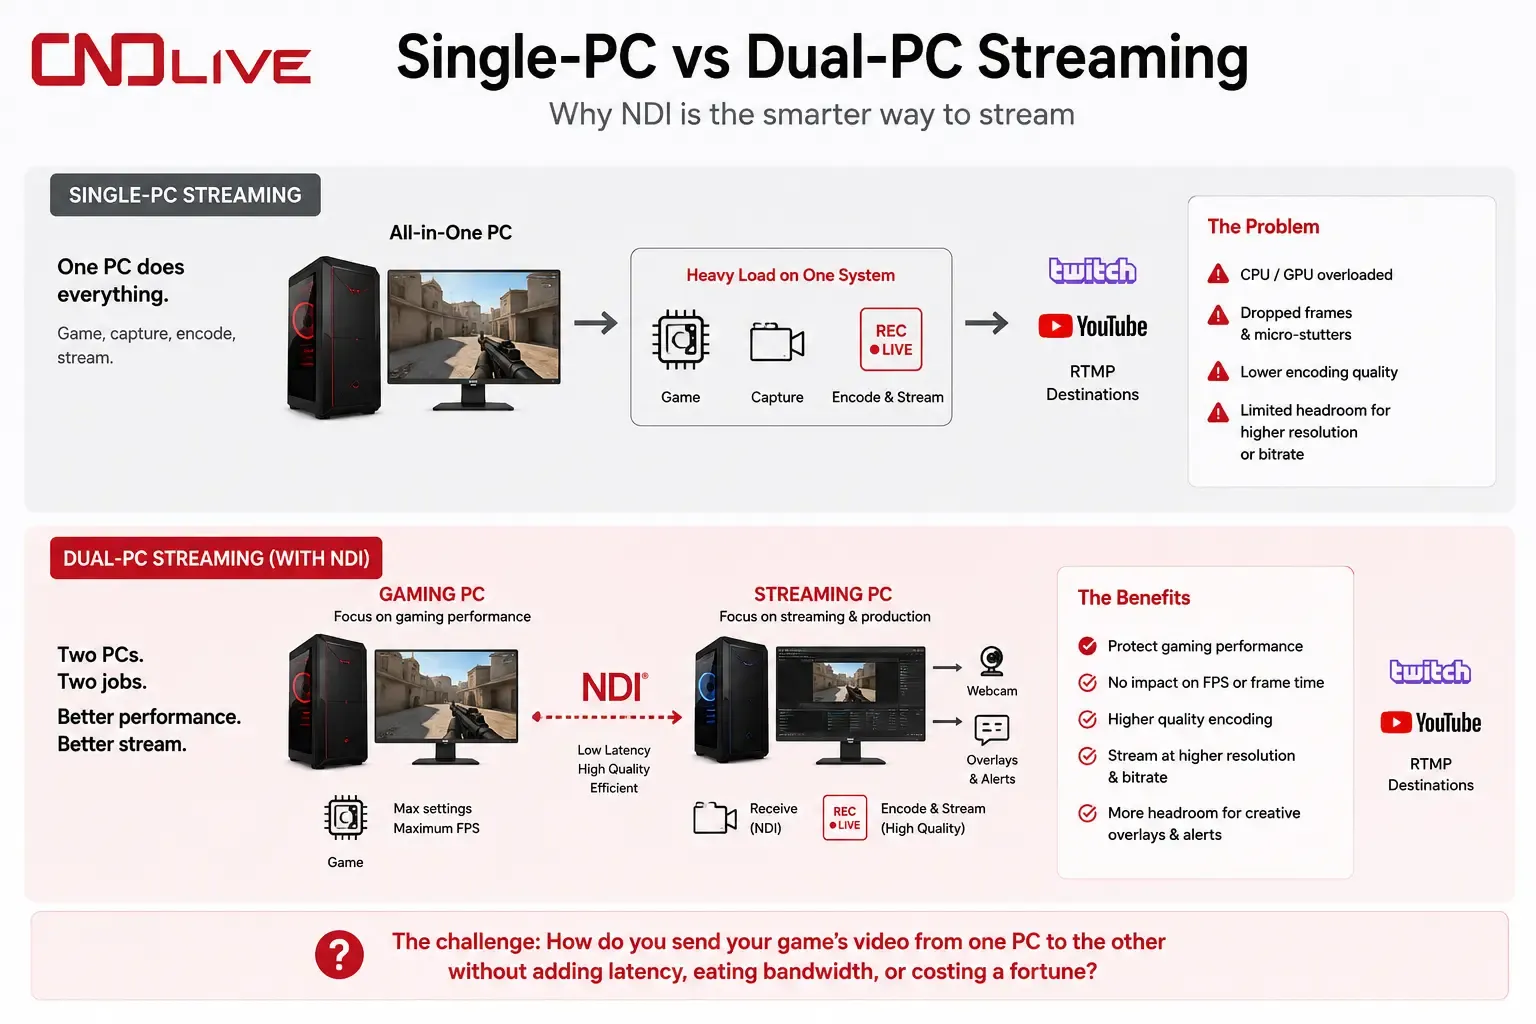
A single-PC setup is the simplest way to go live. You open OBS, add your game capture, and hit “Start Streaming. ” The problem is that modern game engines already push CPUs and GPUs to their limits. When you layer software encoding (x264) or even hardware encoding (NVENC) on top, both frame delivery and encoding quality can suffer. The result: micro-stutters, dropped frames, or a stream that just doesn’t feel as smooth as your actual gameplay.
Dual-PC streaming separates these two workloads entirely.
- Gaming PC: Runs the game at maximum settings, outputs a clean video signal.
- Streaming PC: Receives that signal, adds overlays, alerts, and webcam, then encodes and pushes the final stream to Twitch, YouTube, or any RTMP destination.
By splitting the task, you protect gaming performance and gain far more headroom to use high-quality encoder presets or stream at higher resolutions and bitrates.
The challenge becomes: how do you send your game’s video from one PC to the other without adding latency, eating bandwidth, or costing a fortune?
Three ways to send video to your streaming PC
There are three mainstream architectures for dual-PC streaming. Let’s break them down.
1. Capture card method
A capture card sits between your gaming PC’s GPU and your streaming PC. It takes the HDMI output from your gaming rig and converts it into a USB or PCIe feed that the streaming PC sees as a webcam-like source.
- Pros: Zero load on the gaming PC; extremely stable.
- Cons: You’re limited by HDMI cable length and routing; high-end 4K60 capture cards are expensive; you’ll typically need to clone your main display or run a dedicated HDMI output, which can sometimes introduce resolution or refresh rate headaches.
2. Software NDI (NDI over LAN)
NDI (Network Device Interface) allows you to send audio and video over a standard Ethernet network. With the free DistroAV plugin for OBS, your gaming PC can output its main preview as an NDI stream. The streaming PC on the same network simply adds an NDI Source to its OBS scene.
- Pros: No extra hardware beyond your existing network; easy to set up and highly flexible.
- Cons: The NDI encoding still happens on your gaming PC, consuming roughly 10–15% CPU resource. For extremely CPU-limited games, this can still cause a performance dip.
3. Hardware NDI encoder
This method uses a standalone hardware device that turns an HDMI signal into an NDI stream directly — without involving your gaming PC’s processor at all. You connect your gaming PC’s GPU to the encoder via HDMI, and the encoder does all the heavy lifting. The streaming PC simply receives the NDI stream over the network.
- Pros: Absolutely zero load on the gaming PC; no software to install on the gaming machine; works independently of the host operating system.
- Cons: Requires a capable NDI converter and a solid network infrastructure.
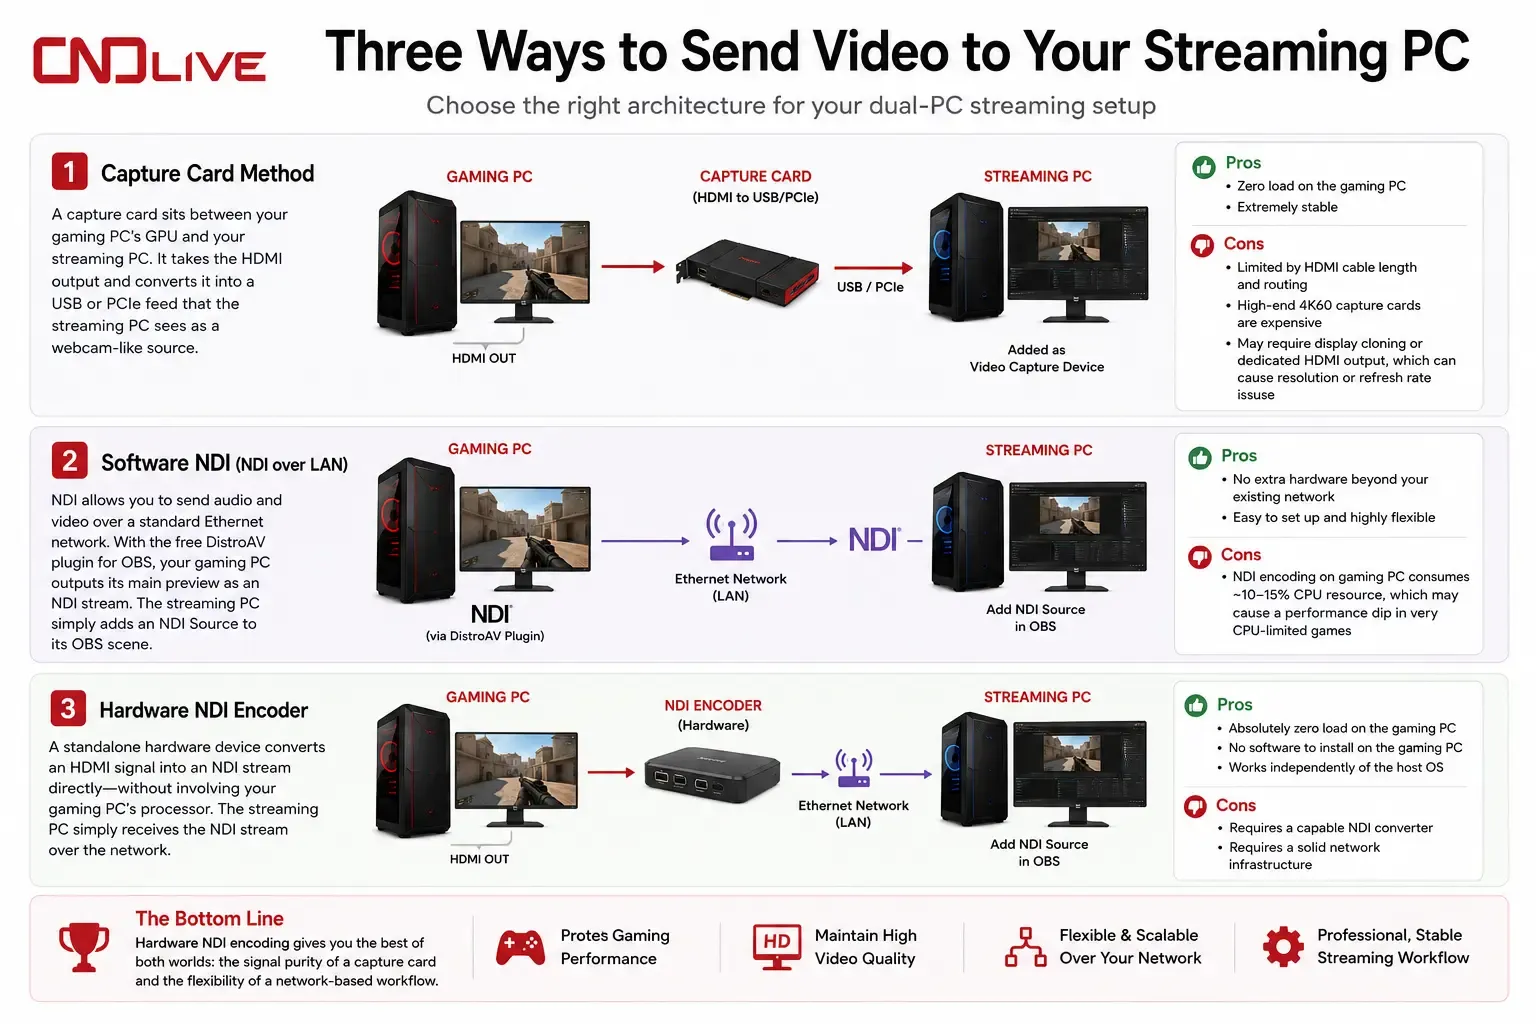
As you can see, hardware NDI encoding gives you the best of both worlds: the signal purity of a capture card and the flexibility of a network-based workflow. To fully understand why that matters, let’s take a quick dive into NDI itself.
What is NDI and why does it change the game?
NDI is a video-over-IP protocol developed by Vizrt Group. It takes video and audio signals, compresses them into data packets, and transports them across standard gigabit Ethernet in real time. Think of it as turning your shooting location into a virtual routing matrix — any source can appear anywhere on the network.
For game streaming, two NDI formats are most relevant:
| Format | Compression | Typical bandwidth (1080p60) | Best for |
|---|---|---|---|
| NDI High Bandwidth (Full NDI) | Very light, intra-frame | ~150 Mbps | Maximum quality, lowest latency |
| NDI | HX (HX2, HX3) | H.264 / HEVC efficient compression | ~10–50 Mbps |
In a local dual-PC setup, NDI High Bandwidth is the first choice — it delivers visually lossless quality and sub-frame latency over a wired gigabit connection. If you ever need to send a stream to a remote producer over the internet, NDI|HX’s lower bitrate makes it far more practical.
About the network requirement, NDI performs best on a wired gigabit LAN. A dedicated network switch between your gaming and streaming PC is ideal. While Wi-Fi 6 can handle NDI|HX in a pinch, Full NDI strongly benefits from the stability of copper Ethernet.
How to set up a dual-PC game streaming workflow with NDI
Now let’s walk through a complete build, using a hardware NDI encoder as our recommended approach. Don’t worry — we’ll also cover how a pure software NDI setup works, so you can understand the differences.
What you’ll need
- Gaming PC: Any rig capable of running your target games at desired settings.
- Streaming PC: A dedicated machine for OBS, ideally with an NVIDIA GPU to take advantage of NVENC encoding.
- Gigabit network switch and Cat6 cables.
- NDI hardware encoder: A device like the CNDLive A1 Bi-Directional NDI Converter (more on this shortly).
- OBS Studio (latest version) installed on the streaming PC, plus the NDI Runtime and DistroAV plugin on both machines if you plan to mix software and hardware sources.
Step-by-step setup (hardware NDI path)
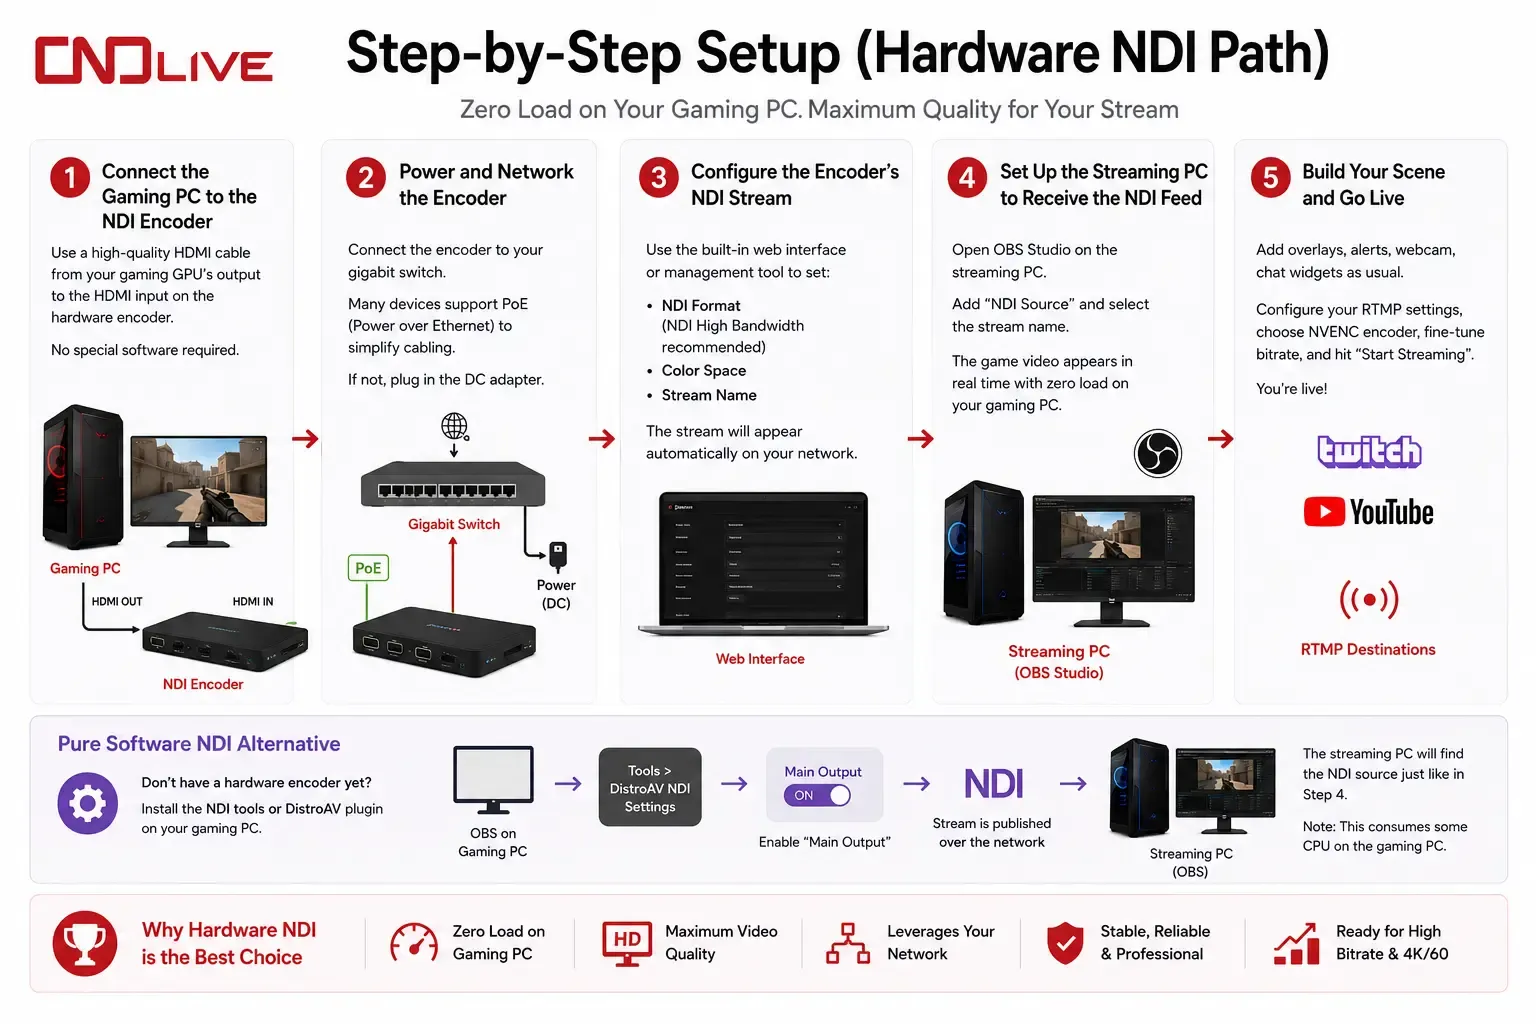
- Connect the gaming PC to the NDI encoder.
Use a high-quality HDMI cable from your gaming GPU’s output to the HDMI input on the hardware encoder. The gaming PC sees this as a normal display — no special software required.
- Power and network the encoder.
Connect the encoder to your gigabit switch. Many hardware NDI devices support PoE (Power over Ethernet), which simplifies cabling. If not, plug in the DC adapter.
- Configure the encoder’s NDI stream.
Using the device’s built-in web interface or management tool, set the desired NDI format (choose NDI High Bandwidth for maximum quality in a local setup), color space, and stream name. The stream should appear automatically on your network.
- Set up the streaming PC to receive the NDI feed.
Open OBS Studio on the streaming PC. Add a new “NDI Source,” and select the stream name your hardware encoder is publishing. The game video will appear in OBS in real time, with no extra load on your gaming PC.
- Build your scene and go live.
Add overlays, alerts, webcam, and chat widgets as usual. In the OBS output settings, configure your streaming service’s RTMP details, select NVENC as the encoder, and fine-tune the bitrate. Hit “Start Streaming” — you’re done.
Pure software NDI alternative: If you don’t have a hardware encoder yet, you can install the NDI tools or DistroAV plugin on the gaming PC. In OBS, go to “Tools > DistroAV NDI Settings” and enable “Main Output.” The streaming PC will then find the NDI source just like in step 4. Remember, this will consume some CPU; it’s a great way to get started, but for heavy titles, a hardware encoder is the final upgrade.
Meet the CNDLive A1 Bi-Directional NDI Converter
Every dual-PC builder eventually hits the same question: what’s the most cost-effective, reliable way to get a hardware NDI signal out of a gaming PC? The CNDLive A1 Bi-Directional NDI Converter is built precisely for this role — and it packs a few surprises most basic encoders can’t match.
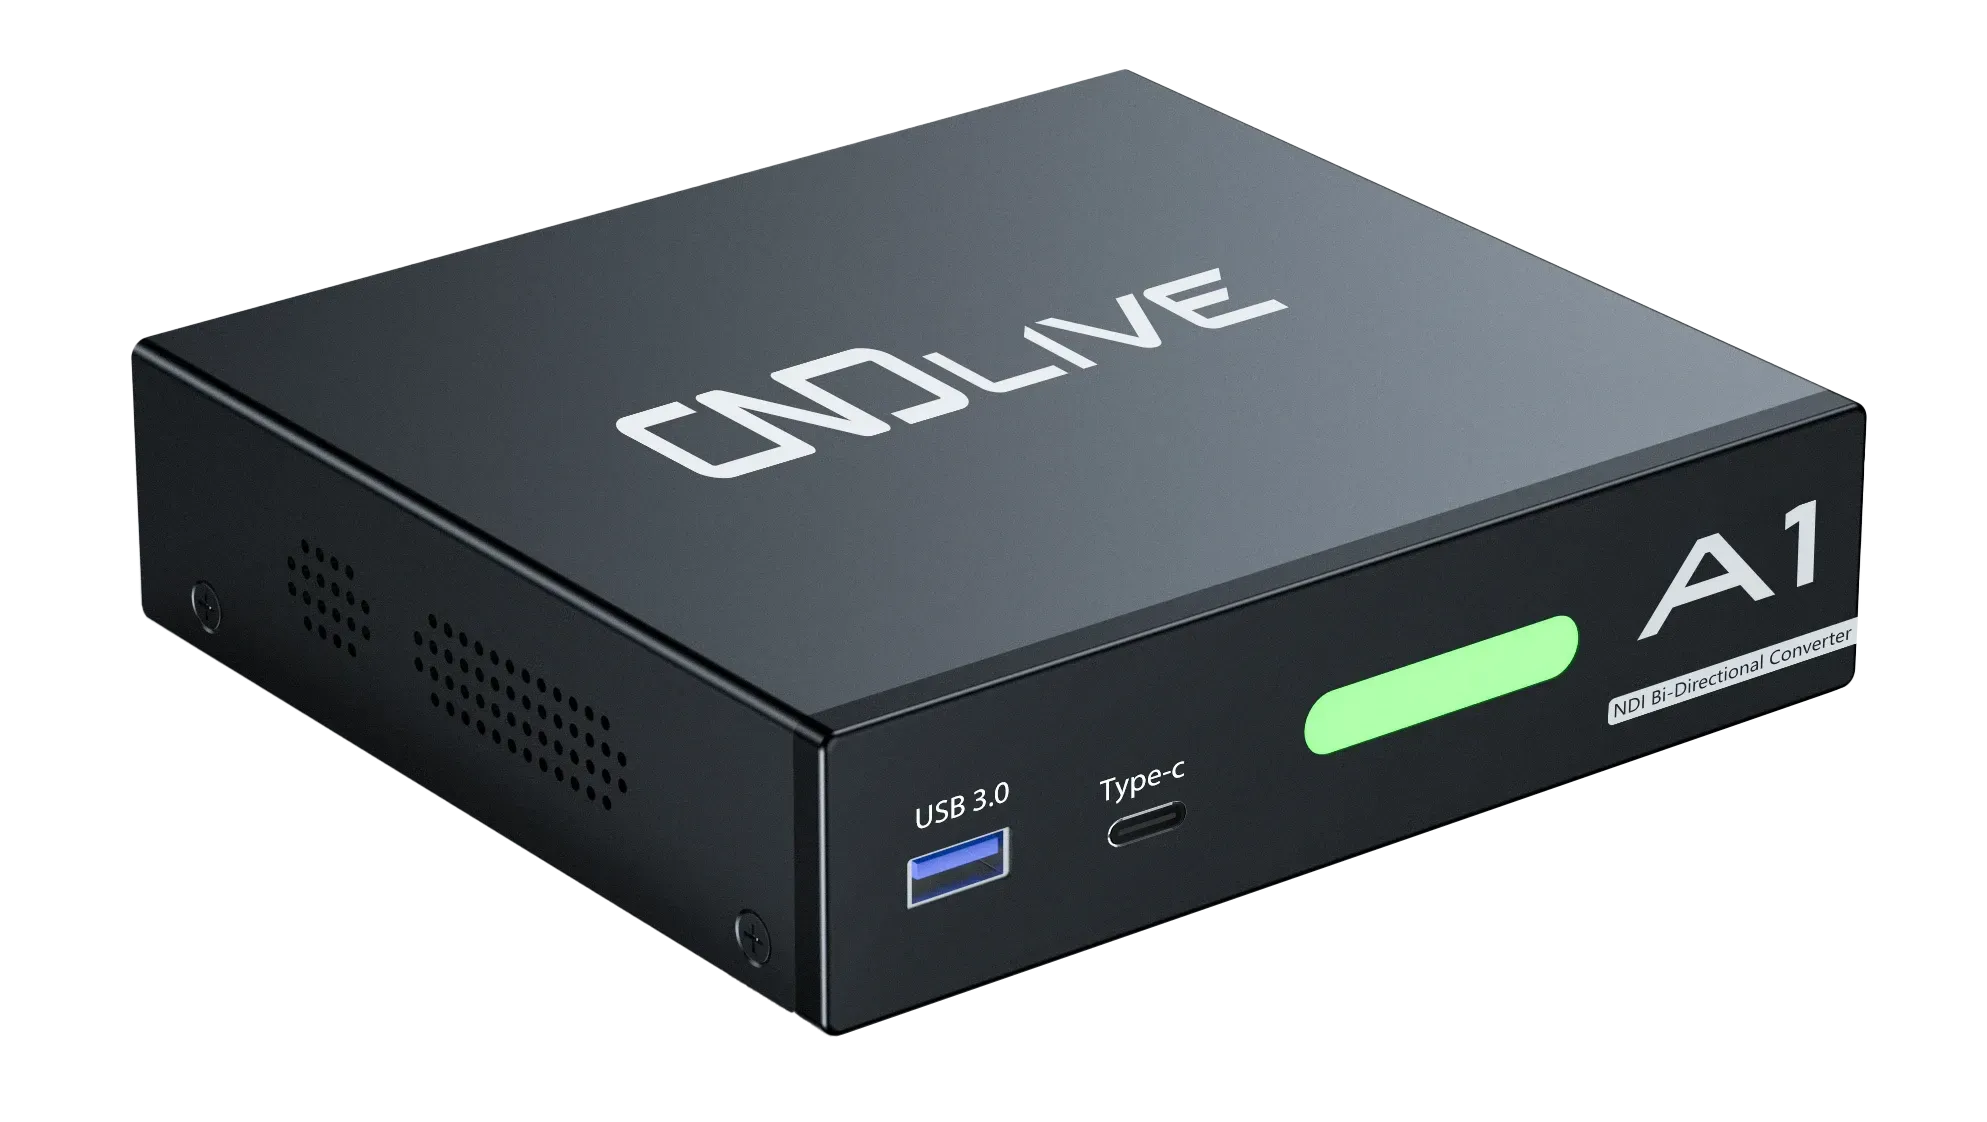
The A1 is a true bi-directional 4K NDI converter. A single device can act as an encoder (HDMI in → NDI out) and a decoder (NDI in → HDMI out). For a gaming streamer, this dual nature unlocks creative workflows we’ll explore next.
Key specifications at a glance
- Video: Up to 3840×2160p at 60Hz over HDMI 2.0
- NDI formats: Full NDI High Bandwidth, NDI|HX2, and NDI|HX3
- Three HDMI ports: One input, one loop-out, and one dedicated decoding output — perfect for monitoring your game feed locally while sending it over the network
- USB 3.0 port: UVC/UAC support allows you to connect a USB camera and turn it directly into an NDI source, no extra PC needed
- Intercom and tally: Built-in support for teamwork, great for multi-camera productions
- Power: 12V DC or PoE (802.3af)
Why the A1 makes perfect sense for game streaming
Zero CPU impact, guaranteed
Because all NDI encoding happens on the A1’s dedicated hardware, your gaming rig never wastes a single clock cycle on streaming work. Even if you play CPU-heavy simulation games or competitive shooters where every frame counts, your performance remains untouched.
Plug-and-play simplicity
The A1 appears on your network as a standalone NDI source. You don’t install software on the gaming PC, you don’t tweak OBS plugins, and you never worry about a background process stealing resources. Connect the HDMI cable, power it up, and the stream is there.
Built-in USB camera ingestion
That USB 3.0 port is a streamer’s hidden gem. Connect your webcam directly to the A1, and it will generate a separate NDI stream for your camera. On the streaming PC, you get two distinct NDI sources — game and camera — from one small box. No USB extenders or secondary PCs needed for the camera feed.
Monitor without extra hardware
The HDMI loop-out port lets you connect a local monitor or a TV to see exactly what’s being sent to the network. This is invaluable for verifying your source signal before you go live, or for couch-screen play while the streaming PC does its work in another room.
Whether you’re a solo streamer looking for the ultimate dual-PC quality or a producer building a multi-cam live show, the A1 slides effortlessly into your setup.
Real-world streaming scenarios with the CNDLive A1
Theory is nice, but seeing how a device works in practice seals the deal. Here are three common game-streaming layouts using the A1.
Scenario 1: The classic dual-PC fortress
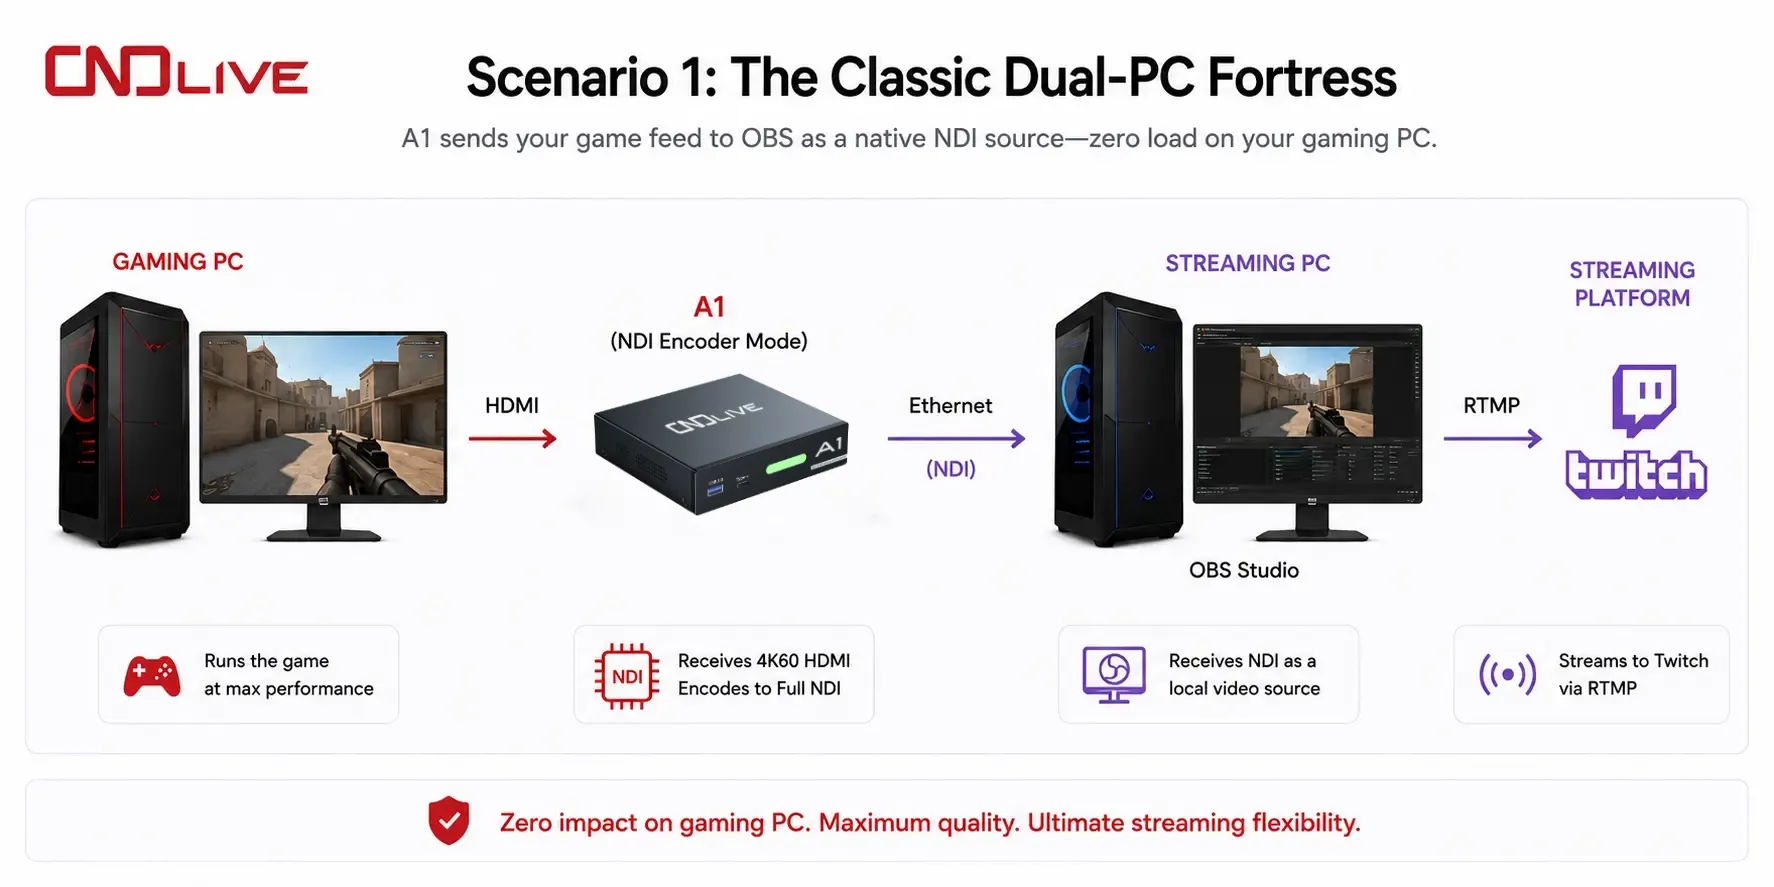
In this scenario,
- The A1 receives a clean 4K60 signal from the gaming rig and encodes it to Full NDI.
- The streaming PC sees the NDI stream as if it were a local video source. You can downscale, add overlays, and encode the final push without ever touching the game machine.
- The gaming PC runs exactly as it would off-stream — no OBS, no plugins.
Scenario 2: Multi-camera streaming with a single A1
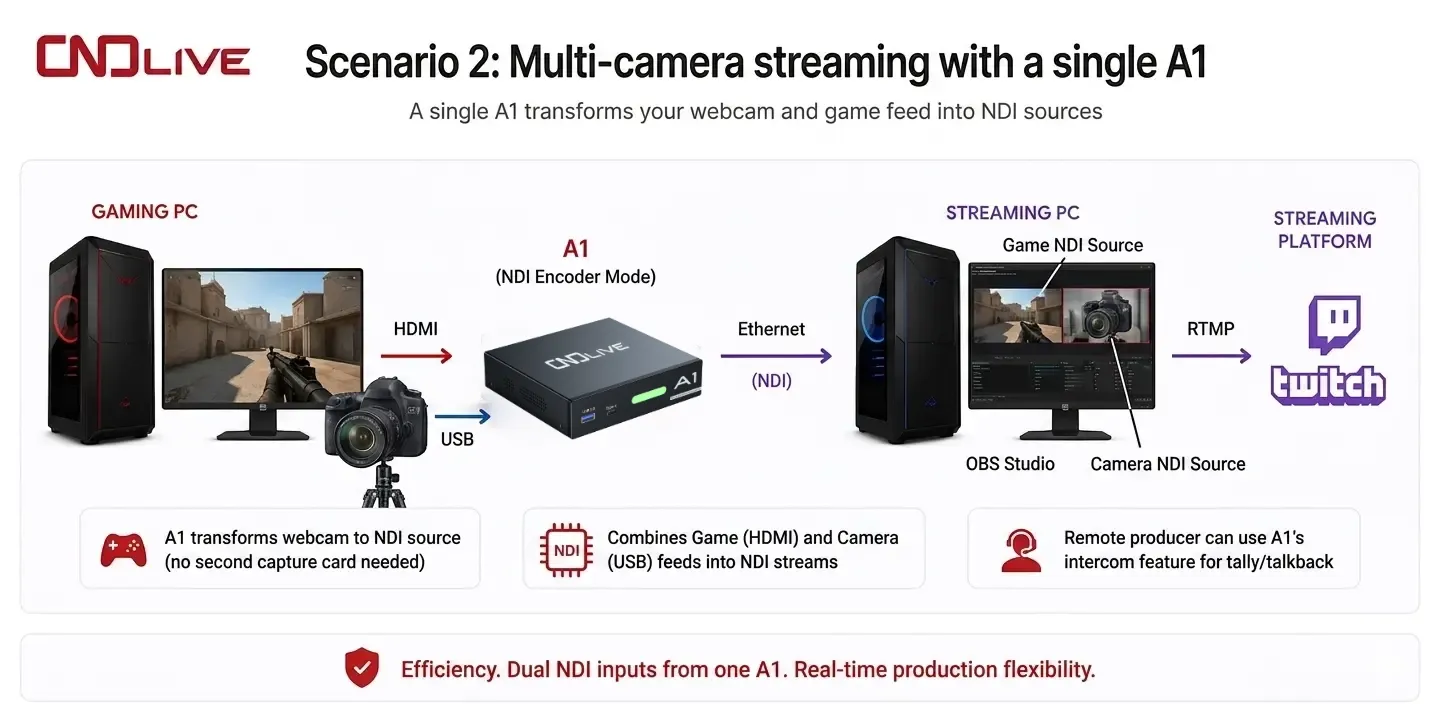
In this scenario,
- You don’t need a second capture card or a complicated USB-over-IP setup for the facecam. The A1’s USB port transforms your webcam into a native NDI signal.
- With the A1’s intercom feature, a remote producer can use tally lights and talkback to communicate with you mid-stream — no shouting across the house.
Scenario 3: Remote production and multi-location streaming
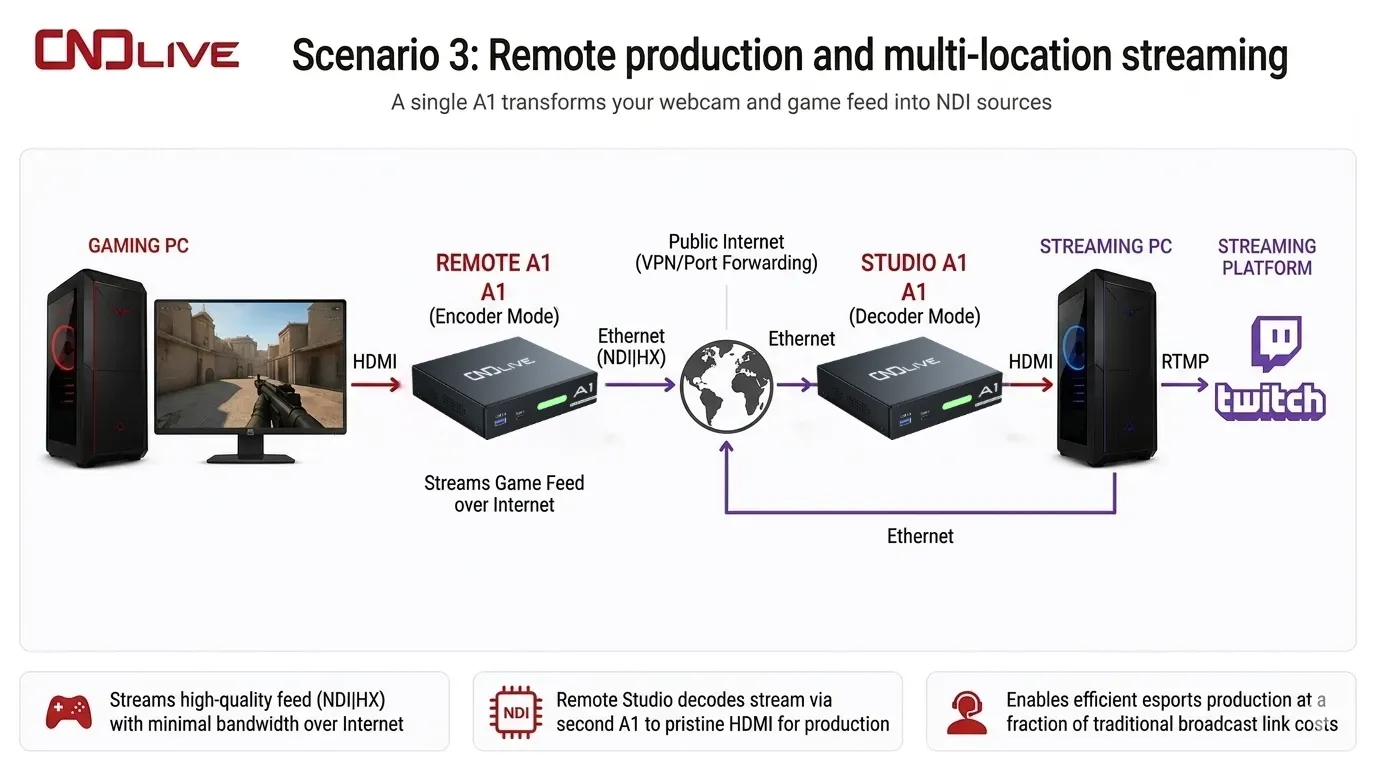
In this scenario,
- An A1 at the streamer’s location encodes the game feed to NDI|HX.
- Over the internet (with proper port forwarding or a VPN), a remote studio receives the NDI stream using a second A1 in decoder mode, which outputs a clean HDMI signal to their vision mixer or capture card.
- This setup is a fraction of the cost of traditional broadcast links and sports events, and it’s increasingly popular among esports producers.
The common theme in all these scenarios is that the A1 acts as a universal bridge between HDMI sources and the NDI ecosystem, giving you the freedom to design your production exactly the way you want it.
Tips for optimizing your game streaming setup
Even the best hardware can’t rescue a neglected network. Use these tips to keep your dual-PC NDI stream rock solid.
- Stick to wired Ethernet. Run at least Cat 6 cables between your gaming PC, streaming PC, and the A1. Avoid Wi-Fi for Full NDI streams.
- Use a dedicated network switch. A small unmanaged gigabit switch separates your streaming traffic from your home internet traffic and ensures consistent bandwidth.
- Plan your bandwidth. A single 1080p60 NDI High Bandwidth stream uses around 150 Mbps. If you’re running multiple NDI feeds (camera, game, etc.), make sure your switch and PC NICs can handle the aggregate throughput. Gigabit is plenty for two or three streams, but keep it in mind when adding more sources.
- Optimize OBS output settings.
- Use NVENC (or the equivalent hardware encoder on your streaming GPU) to free up CPU.
- Keyframe interval: 2 seconds is standard for Twitch.
- Resolution/framerate: match your platform’s recommended settings (e.g., 1080p at 60 or 936p at 60 for a balance of quality and bandwidth).
- Keep NDI components up to date. Install the latest NDI Runtime and DistroAV plugin version. When OBS releases a major update, check for compatibility notes.
- Common troubleshooting: If your NDI source disappears, check Windows Firewall — allow OBS and the NDI discovery service on private networks. If you notice audio sync drift, enable “network smoothing” in the NDI source properties on the streaming PC (or adjust buffer settings on the encoder).
Conclusion: Build your zero-compromise streaming rig
Game streaming has evolved far beyond the constraints of a single PC. A dual-PC setup with NDI gives you pristine quality, total performance separation, and a production workflow that scales from your bedroom to a large-scale esports event.
By choosing a hardware NDI encoder like the CNDLive A1 Bi-Directional NDI Converter, you remove the last bottleneck. Your gaming PC stays lean, your video signal travels across the house (or the world) over standard Ethernet, and you gain useful extras like USB camera ingestion, intercom, and a loop-out monitor port — all in one compact box.
The result is a stream that looks as good as your game feels: crisp, fluid, and completely uncompromised.