Quick Srart Guide
Please read this document to familiarize yourself with the unit’s functions. Note that specifications are subject to change without notice.
1. Packing List
Section titled “1. Packing List”- D1 Main Unit × 1
- Power Adapter × 1
- Warranty Card × 1
- Quick User Guide × 1
- Certificate × 1
2. Device Interface
Section titled “2. Device Interface”Front Panel
Section titled “Front Panel”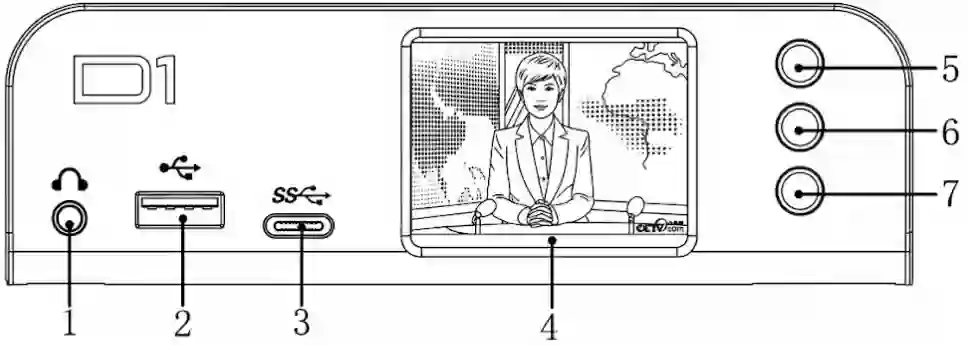
| No. | Name | Function |
|---|---|---|
| 1 | Line out | 3.5mm audio output |
| 2 | USB-A 3.0 | Peripheral interface |
| 3 | Type-C | Peripheral interface |
| 4 | LCD Screen | 2-inch screen for status and menu display |
| 5 | Up | Menu navigation button |
| 6 | OK | Confirmation button |
| 7 | Down | Menu navigation button |
Rear Panel
Section titled “Rear Panel”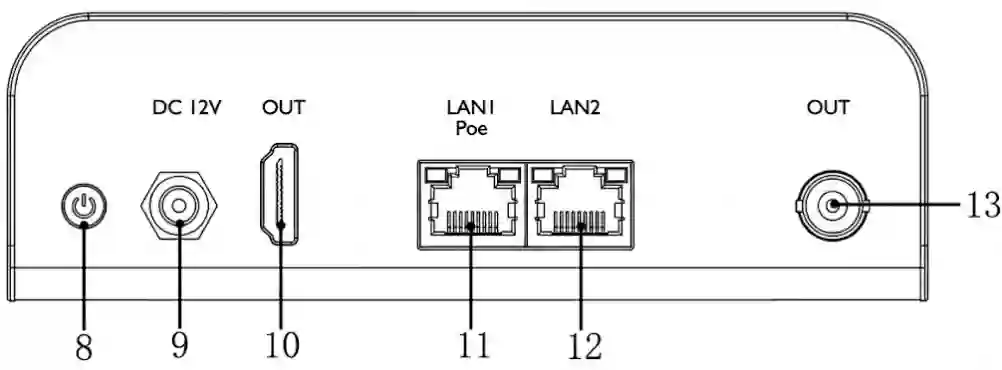
| No. | Name | Function |
|---|---|---|
| 8 | Power Switch | Device power on/off switch |
| 9 | DC 12V | Power input interface |
| 10 | HDMI Output | HDMI video output interface |
| 11 | LAN 1 (PoE) | 1000M Ethernet port, supports PoE |
| 12 | LAN 2 | 1000M Ethernet port |
| 13 | SDI Output | SDI video output interface |
3. Device Connection
Section titled “3. Device Connection”Follow the instructions below to connect the device:
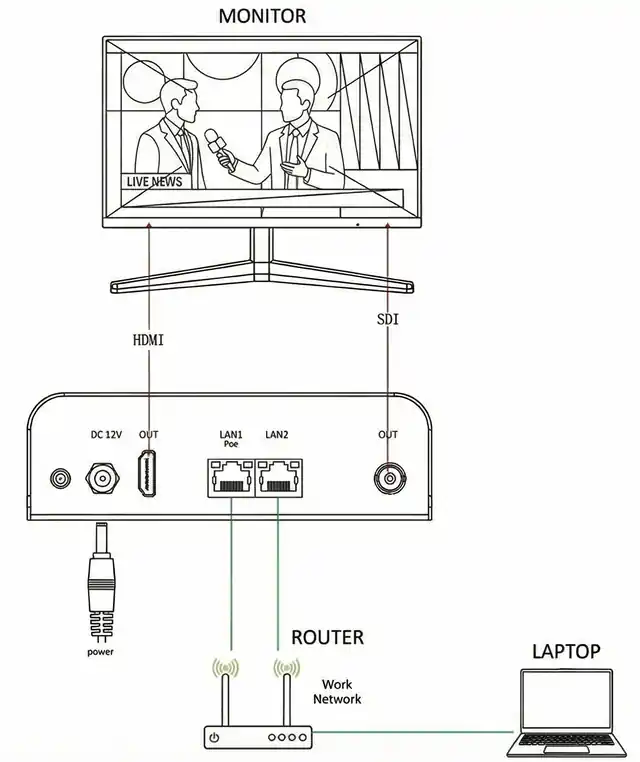
- Video Connection: Connect the HDMI or SDI interface to your display device.
- Note: HDMI and SDI can be output simultaneously, or either one interface can be connected.
- Network Connection: Connect the LAN 1 or LAN 2 port to your network switch or router using a network cable.
- Power Connection: Connect the power adapter to the DC 12V port.
- Note: Please use the power adapter carried with the device to power the device; using an unqualified power supply may damage the device.
- Power On: Once the unit is installed, turn the unit on using the Power Switch.
4. Getting Started
Section titled “4. Getting Started”4.1 View the IP Address
Section titled “4.1 View the IP Address”You can find the IP address through the LCD screen (ensure your network supports DHCP).
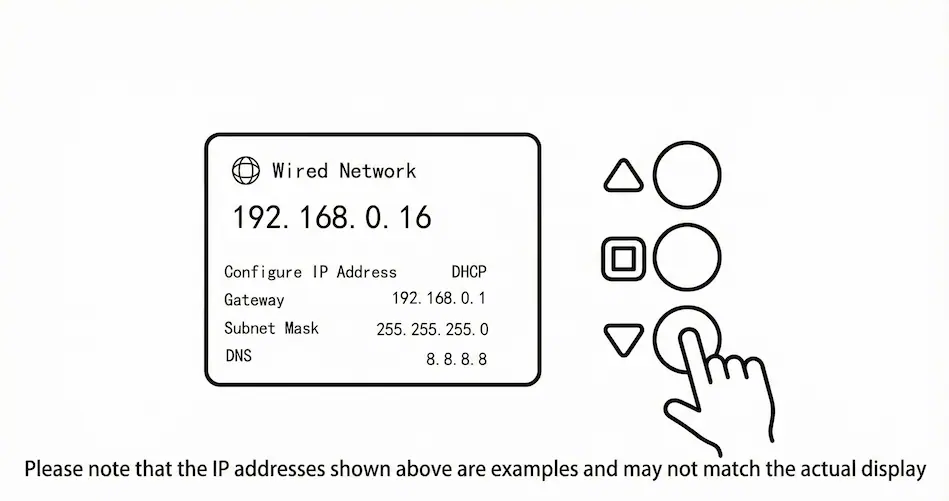
- On the front panel, press the Down button.
- Stop when you see the “Wired Network” information screen.
- Note the IP address displayed (e.g.,
192.168.0.16).
4.2 Login to the WEB Page
Section titled “4.2 Login to the WEB Page”- On a computer connected to the same network, open a web browser.
- Enter the IP address found in step 4.1 and press Enter.
- In the login screen, enter the default credentials:
| Parameter | Default Value |
|---|---|
| User Name | admin |
| Password | admin |
4.3 Select Video Source
Section titled “4.3 Select Video Source”To decode a stream, you must add it as a source in the web interface.
- In the “Video sources” area, click the Add button (marked with a + symbol).
- Select Protocol: In the pop-up window, select the appropriate video source protocol (NDI, RTSP, SRT, RTMP/RTMPS, RTMP Server, HLS, UDP, etc.).
- Note: If you are not sure which protocol applies, refer to the user manual of your source device.
- Enter Info: Fill in the necessary information (server address, stream name, port, etc.).
- Click Add to confirm.
4.4 Decoding Output
Section titled “4.4 Decoding Output”On the right side of the web page, select the output interface you wish to use: HDMI or SDI.
Methods to Output Video:
- Click: Click on a decoding window pane, then select the video source from the list.
click
- Drag: Drag the video source directly from the list to the decoding window.
Additional Settings:
- Split Screen: Use the layout icons in the upper right corner to select split-screen modes (supports up to 4-panel layout).
- Parameters: Click the Settings icon to adjust parameters like Resolution (e.g., 1920x1080P 60Hz), HDMI/DVI Mode, Color Space, and Audio settings.
Note: Ensure settings are compatible with your display device.
5. Software Upgrade
Section titled “5. Software Upgrade”- Click “Upgrade” to enter the upgrade page.
- Check if the latest software version is higher than the “Current Firmware Version”.
- Click “Select File”, choose the firmware file, and click “Upgrade”.
- The device will update and automatically reboot.
Warning: Do not disconnect the power during the upgrade process (approx. 5 minutes). If the device fails to boot, contact technical support.
6. Restore Factory Settings
Section titled “6. Restore Factory Settings”If the device does not work properly, you can restore factory settings. This will reset the IP mode, password, and configurations.
Method 1: Via LCD Screen
- Go to the “State” page.
- Press Enter to access “System Settings”.
- Select “Reset” and confirm.
Method 2: Via Web Page
- Navigate to Settings > System settings.
- Click “Restore factory settings”.
Note: The default username and password will be restored to
admin.
7. Support
Section titled “7. Support”If you need more support, please contact the manufacturer.
- Email: support@cndlive.com